This page relates to an older version 1.17 of Rich Filters for Jira Dashboards for Server & Data Center. See the documentation index for other versions, or for the Cloud version of Rich Filters.
The Rich Filter Controller Gadget
In this section:
- About the Rich Filter Controller gadget
- Configuring the Rich Filter Controller gadget
- Filtering mode
- Dashboard State Permalinks
1. About the Rich Filter Controller gadget
The Rich Filter Controller gadget controls what the other rich filter gadgets display (on the same dashboard and based on the same rich filter as the controller). The controller does not display any issue data; it only displays the quick filters that have been defined in the rich filter.

The Rich Filter Controller gadget also allows the user to store the state of the quick filters in an URL. To learn more, see the Dashboard State Permalinks section.
2. Configuring the Rich Filter Controller gadget
Add a new or edit an existing Rich Filter Controller gadget in your Jira dashboard. The configuration form of the gadget will be displayed:
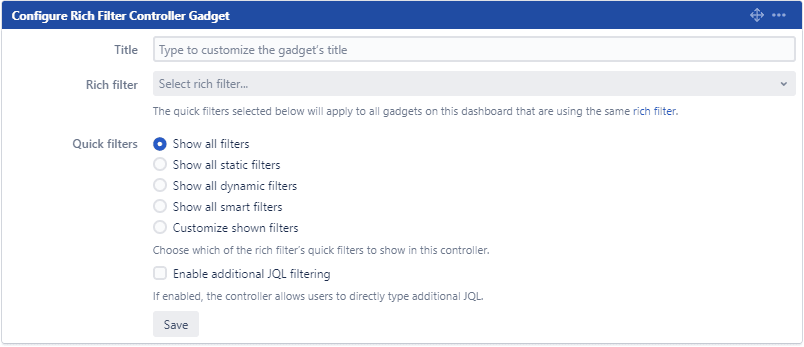
Edit the gadget configuration as described in the following table:
| Setting | Description |
|---|---|
Title | Optionally, you can customize the title of the gadget. If left blank, the default title will be Rich Filter Controller. Whether you set a custom title or leave the default, all rich filter gadgets will prefix their titles with the name of their rich filter, so you can see at a glance which gadgets are connected with each other. |
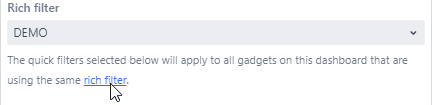
Rich Filter | Select the rich filter the gadget will use. Click on the Rich Filter button to display the list of rich filters; you can either scroll through or use the search box to find the filter you need. The gadgets’ configuration forms only show the rich filters you are allowed to view. See the section on permissions for details. The link in the description line below the Rich Filter drop-down opens a new page with the configuration of the selected rich filter.
Also, when the gadget is in display mode, you can navigate directly to the rich filter of the gadget using the Rich Filter option in the menu at the top right of the gadget. 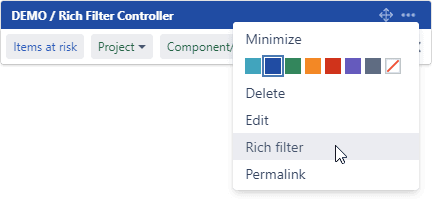 |
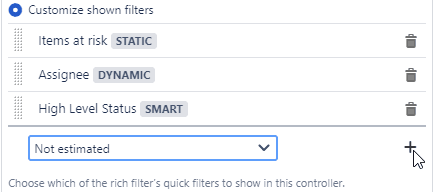
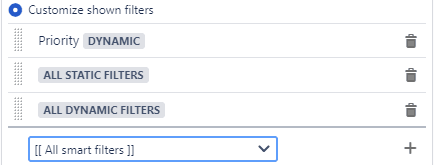
Quick Filters | Once you have selected a rich filter for your gadget, you can customize which quick filters you want to display in your controller. By default, controllers show all available quick filters. You can use the radio buttons to change this and display only static, only dynamic or only smart filters, or you can choose to customize in detail which quick filters to show and in what order using the last option. If you choose the Customize shown filters option, the configuration form will change to display the list of quick filters. You can add, remove or reorder (drag and drop the vertical “grid”) the quick filters to be displayed.
Besides the individual quick filters, the custom list menu also contains three “group” options: All Static Filters, All Dynamic Filters and All Smart Filters. If used, the gadget will display in their place all quick filters of the specified type except those that are explicitly included. For example, you can use this to show the Priority dynamic filter first, then all static filters, and then all dynamic filters other than Priority.
It is usually best to have a controller at the top of the dashboard, where it is easily visible and accessible. You can add multiple controller gadgets on the same dashboard and with the same rich filter. You can use this to arrange your quick filters on multiple sections/layouts. You can even add the same quick filter in multiple controllers: they are kept synchronized automatically. You can use this to put a second controller below tall gadgets, so you can reach the quick filters without needing to scroll up. |
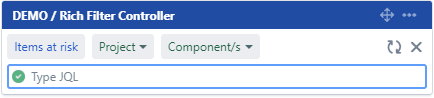
| Enable additional JQL filtering | This option is more relevant to advanced users. If the additional JQL filtering is enabled, the controller will also allow users to type additional JQL directly in the controller. The JQL will be applied to all the other rich filter gadgets (on the same dashboard and based on the same rich filter as the controller).
If the additional JQL filtering is enabled, the controller shows a +JQL button. When the button is clicked, the controller displays the additional JQL box that allows users to apply new custom filtering.
Do you wish to display only the JQL filtering box in your controller? Then you should select "Customize shown filters" and make sure no quick filter is selected, and then enable only the additional JQL filtering.
In this particular configuration, the controller will permanently display only the JQL filtering box.
|


3. Filtering mode
For dynamic filters that display drop-downs (ex: Component/s, Labels, Status, Assignee, etc), the controller provides the following filtering modes:
- OR: this is the default filtering mode. If multiple values are selected, these are ORed – the filter returns all the issues that match any (at least one) of the selected values:
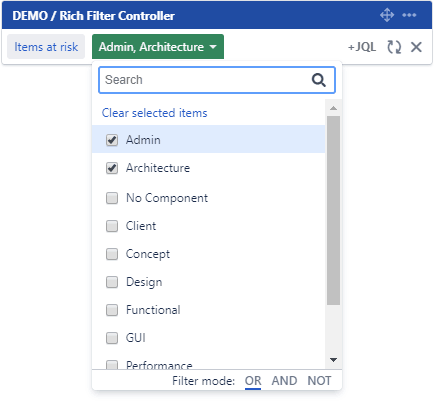
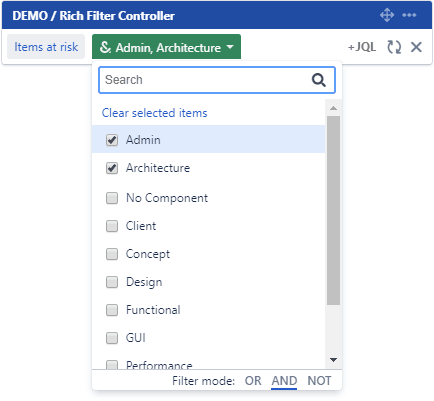
The JQL generated for the example above is"component in (Admin, Architecture)"which is functionally equivalent with"component = Admin OR component = Architecture". - AND: if multiple values are selected, these are ANDed – the filter returns all the issues that match all of the selected values at the same time:
The JQL generated for the example above is"component = Admin AND component = Architecture". - NOT: the selected values are negated – the filter will return issues that don't match any of the selected values:
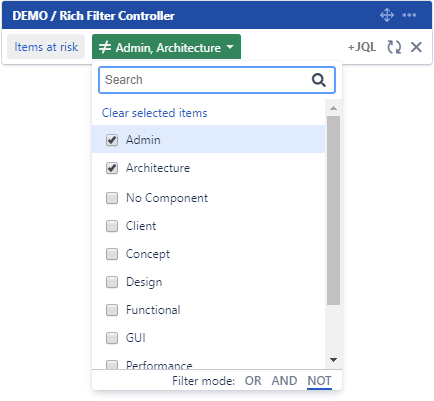
The JQL generated for the example above is"component not in (Admin, Architecture) or component is empty".
The AND filtering mode is available only for the fields that can have multiple values. For instance, users can search for issues that have component A and component B at the same time. But it does not make any sense to search for issues that have priority High and Low at the same time, because the priority field can have only one value at a time. For dynamic filters that cannot have multiple values, only the OR and NOT filtering modes are available.
4. Dashboard State Permalinks
Dashboard state permalinks are URLs that encode the state of the rich filter gadgets on the dashboard. Later, you can use the URL to open the dashboard and restore the rich filter gadgets to the same state.
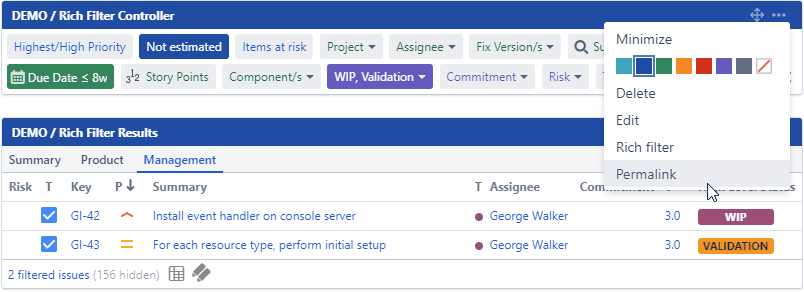
To generate a dashboard state permalink, open the menu of any Rich Filter Controller gadget on the dashboard and select the option Permalink:
This will open a dialog containing a generated URL which encodes the state of all the rich filter gadgets on the dashboard.
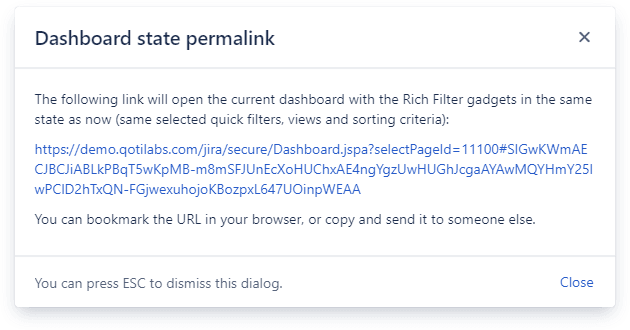
You can bookmark this URL or you can send it to someone else. When the URL is opened, the rich filter gadgets will be restored to the same state as when the link was generated: same quick filters selected, same selected views and the same sorting criteria in the Rich Filter Results gadgets.
If you have more than one controller or more than one rich filter in the dashboard, the dashboard state permalink will encode the state of all controllers for all rich filters, no matter from which controller you generate the URL. All the Rich Filter Controllers on the dashboard generate the same permalink.